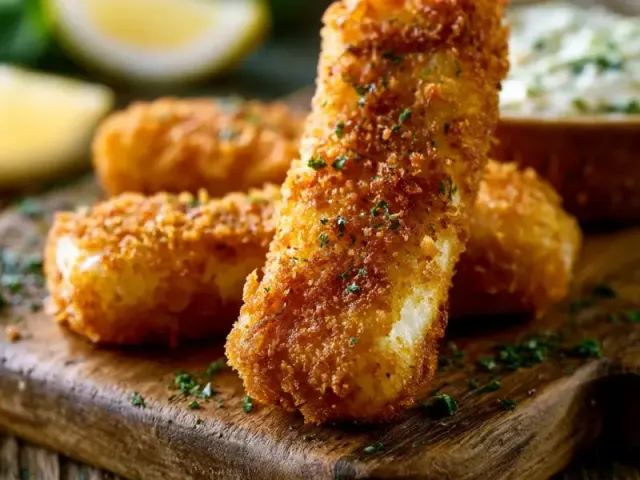
Homemade Fish Sticks for Backyard Summer
The first time I made fish sticks from scratch, I was startled by how different they were from the frozen kind. The fish was flaky and tender inside, the crust shatteringly crisp—not a soggy patch in sight. That contrast is why I keep coming back to this method, especially for summer backyard meals when you want something satisfying but not heavy.

These homemade fish sticks are straightforward: a simple breading of flour, egg, and seasoned panko, baked on a wire rack for all-around crunch. The lemon-dill yogurt dip cuts through the richness with brightness. No deep-frying, no mess, just pure technique that works every time.
The Fish: Choose Firm, White, and Fresh
Firm white fish is non-negotiable here. Cod is my go-to because it holds its shape beautifully and flakes cleanly. Haddock, pollock, or halibut are excellent substitutes. The key is patting the fillets very dry with paper towels before cutting—moisture is the enemy of a crispy crust. Cut the fish into uniform sticks, about 3 inches long and 1 inch wide. This ensures even cooking; thinner pieces will overcook before the thicker ones are done.
The Breading: A Three-Step Sequence
Set up a breading station with three shallow dishes. In the first, all-purpose flour. In the second, two beaten eggs. In the third, panko breadcrumbs mixed with garlic powder, paprika, salt, and pepper. The order matters: flour first helps the egg adhere, and the egg gives the panko something to grip. Press the panko gently onto each stick—don't pack it, just let it cling naturally.
A common mistake is skipping the flour step. Without it, the egg slides off the fish, leaving bare patches. Another is using regular breadcrumbs instead of panko. Panko's larger, flakier texture creates a lighter, crunchier coating. If you only have regular breadcrumbs, toast them in a dry skillet for 2-3 minutes to improve texture.
The Cooking: Oven or Air Fryer
Preheat your oven to 425°F (220°C). Line a baking sheet with parchment paper and place a wire rack on top. Arrange the breaded fish sticks on the rack so they don't touch. This allows hot air to circulate fully, crisping the bottom as well as the top. Lightly spray or brush them with oil—just enough to encourage browning. Bake for 8-10 minutes. You'll know they're done when the coating is golden and the fish flakes easily when pierced with a fork. No need to flip.
If using an air fryer, cook at 400°F (200°C) for 6-8 minutes, shaking the basket halfway through. The air fryer yields an even crunchier exterior, but the oven method is more hands-off and works well for larger batches.
The Dip: Lemon-Dill Yogurt
While the fish bakes, whisk together plain Greek yogurt, fresh lemon juice, chopped fresh dill, and a pinch of salt. The yogurt's tanginess balances the richness of the fish, while dill adds a fresh, herbal note. Taste and adjust—more lemon for brightness, more dill for herbaceousness. This dip also works beautifully with other seafood or as a veggie dip.
Common Mistake to Avoid
Overcrowding the baking sheet. If the fish sticks are too close, they steam instead of crisping. Leave at least half an inch between each piece. If you have a large batch, use two baking sheets or cook in batches.
Serving Suggestions
Serve the fish sticks hot, straight from the oven, with the dip on the side. They pair well with a simple green salad, coleslaw, or roasted potato wedges. For a backyard summer spread, add lemon wedges and extra dill for garnish.
Takeaway: The secret to exceptional homemade fish sticks is dry fish, a proper three-step breading, and cooking on a wire rack. That combination guarantees a crispy, golden crust and tender, flaky fish every time. No deep-fryer required.
Frequently Asked Questions
Can I use frozen fish for this recipe?
Yes, but thaw it completely in the refrigerator and pat it very dry with paper towels before cutting. Excess moisture will make the breading soggy.
What other fish can I use besides cod?
Any firm white fish works—haddock, pollock, tilapia, or even halibut. Avoid delicate fish like sole, which may fall apart.
Can I make these fish sticks gluten-free?
Absolutely. Substitute gluten-free all-purpose flour and gluten-free panko breadcrumbs. The cooking time remains the same.
Why use a wire rack on the baking sheet?
It allows hot air to circulate under the fish sticks, preventing the bottoms from steaming and keeping them crispy on all sides.
Backyard Summer Homemade Fish Sticks

Crispy, golden fish sticks made from scratch with a light panko coating and a zesty lemon-dill yogurt dip. Perfect for a sunny backyard meal.
- baking sheet
- wire rack
- mixing bowls
- sharp knife
- cutting board
- shallow dishes
- oven or air fryer
- 1 lb firm white fish fillets (like cod or haddock)
- 1/2 cup all-purpose flour
- 2 large eggs
- 1 cup panko breadcrumbs
- 1/2 tsp garlic powder
- 1/2 tsp paprika
- 1/4 tsp salt
- 1/4 tsp black pepper
- 2 tbsp olive oil or avocado oil spray
- For the dip:
- 1/2 cup plain Greek yogurt
- 1 tbsp fresh lemon juice
- 1 tbsp chopped fresh dill
- 1/4 tsp salt
- Preheat your oven to 425°F (220°C). Line a baking sheet with parchment paper and place a wire rack on top. This helps air circulate for even crisping.
- Pat the fish fillets dry with paper towels. Cut them into sticks about 3 inches long and 1 inch wide. Set aside.
- Set up a breading station: one shallow dish with flour, one with beaten eggs, and one with panko mixed with garlic powder, paprika, salt, and pepper.
- Dredge each fish stick first in flour, shaking off excess. Dip into egg, letting excess drip off. Then coat in the panko mixture, pressing gently so it sticks.
- Place the coated sticks on the wire rack. Lightly spray or brush them with oil. This is key for golden color and crunch.
- Bake for 8-10 minutes, until golden and fish flakes easily with a fork. No need to flip. For air fryer: cook at 400°F for 6-8 minutes, shaking halfway.
- While fish bakes, mix yogurt, lemon juice, dill, and salt in a small bowl. Taste and adjust lemon or salt.
- Serve fish sticks warm with the dip. Enjoy immediately for maximum crunch.
Leftover fish sticks can be stored in an airtight container in the fridge for up to 2 days. Reheat in a 350°F oven or air fryer for 3-4 minutes to restore crispness. The dip keeps for 3 days in the fridge. For a gluten-free version, use gluten-free panko and flour.
Recipe: Backyard Summer Homemade Fish Sticks
Equipment
- baking sheet
- wire rack
- mixing bowls
- sharp knife
- cutting board
- shallow dishes
- oven or air fryer
Ingredients
- 1 lb firm white fish fillets (like cod or haddock)
- 1/2 cup all-purpose flour
- 2 large eggs
- 1 cup panko breadcrumbs
- 1/2 tsp garlic powder
- 1/2 tsp paprika
- 1/4 tsp salt
- 1/4 tsp black pepper
- 2 tbsp olive oil or avocado oil spray
- For the dip:
- 1/2 cup plain Greek yogurt
- 1 tbsp fresh lemon juice
- 1 tbsp chopped fresh dill
- 1/4 tsp salt
Instructions
- Preheat your oven to 425°F (220°C). Line a baking sheet with parchment paper and place a wire rack on top. This helps air circulate for even crisping.
- Pat the fish fillets dry with paper towels. Cut them into sticks about 3 inches long and 1 inch wide. Set aside.
- Set up a breading station: one shallow dish with flour, one with beaten eggs, and one with panko mixed with garlic powder, paprika, salt, and pepper.
- Dredge each fish stick first in flour, shaking off excess. Dip into egg, letting excess drip off. Then coat in the panko mixture, pressing gently so it sticks.
- Place the coated sticks on the wire rack. Lightly spray or brush them with oil. This is key for golden color and crunch.
- Bake for 8-10 minutes, until golden and fish flakes easily with a fork. No need to flip. For air fryer: cook at 400°F for 6-8 minutes, shaking halfway.
- While fish bakes, mix yogurt, lemon juice, dill, and salt in a small bowl. Taste and adjust lemon or salt.
- Serve fish sticks warm with the dip. Enjoy immediately for maximum crunch.