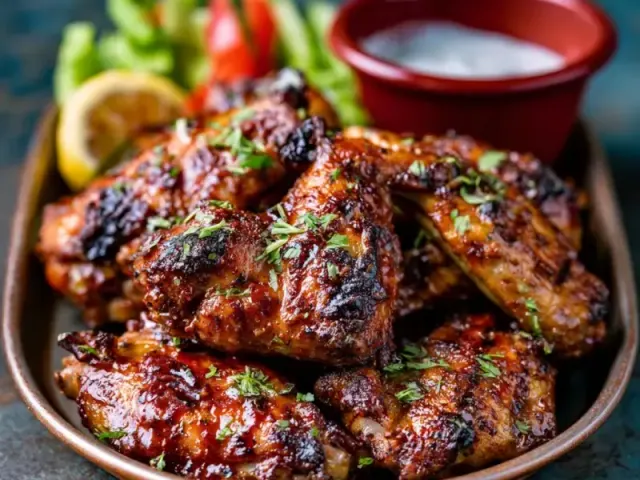
Backyard Grilled Chicken Wings That Snap and Sizzle
I still remember the first time I pulled a batch of grilled wings off the coals and they actually snapped when I bit into them. That crisp sound, the juice flooding in — it wasn't luck. It was technique. Backyard grilled chicken wings don't have to be a gamble. You can get that deep char, that tender meat, and that skin so thin it shatters, all without a deep fryer in sight.

The secret isn't a complicated rub or a fancy smoker. It's about how you treat the wings before they ever hit the grate. And how you manage the fire. Let's walk through it.
The Wing Prep That Makes the Difference
Most people skip the most important step: drying the wings. Pat them dry with paper towels — really dry. Then toss them in a mixture of baking powder (aluminum-free), salt, and pepper. The baking powder raises the skin's pH, helping it brown faster and crisp up. It sounds like a science trick, but it's just kitchen chemistry.
After coating, arrange the wings on a wire rack over a baking sheet. Slide them into the fridge uncovered for at least one hour, or overnight if you're planning ahead. The air circulation dries the surface even more. You'll see the skin tighten and turn slightly tacky. That's good.
Building the Fire for Two-Zone Grilling
Backyard grilled chicken wings need two heat zones: a hot side for searing and a cooler side for gentle cooking. For charcoal, bank the lit coals to one side. For gas, light one burner and leave the other off. Aim for 400-450°F on the direct side and around 325°F on the indirect side.
Why two zones? Direct heat alone will char the skin before the meat near the bone cooks through. Indirect heat first renders the fat and cooks the meat evenly. Then a quick sear at the end gives you that crust. It's the same logic as reverse-searing a steak.
Grilling: The Slow Part First
Place the wings on the indirect heat side, skin side up. Cover the grill. Let them cook for 20 minutes, flipping once at the 10-minute mark. The skin will turn golden and look slightly puffed. The internal temperature should be around 160°F. Don't rush this stage.
Common mistake: opening the lid too often. Every peek lets heat escape and extends cooking time. Trust the fire.
The Final Char
Move the wings to the direct heat side. Grill 2-3 minutes per side, watching closely. The skin will bubble and darken in spots. You're looking for an internal temperature of 175°F. That's the sweet spot where the connective tissue breaks down and the meat stays juicy, not dry.
Use an instant-read thermometer. It's the only reliable way. Wings are safe at 165°F, but they're much better at 175-180°F.
A Simple Glaze That Won't Burn
While the wings char, make a quick glaze. Melt butter in a small saucepan, add minced garlic for 30 seconds, then stir in honey, soy sauce, apple cider vinegar, and a pinch of smoked paprika. Simmer for 2 minutes until it thickens slightly. The vinegar cuts the sweetness, and the soy adds depth.
Brush the glaze on after grilling, not during. Sugary glazes burn on direct heat. Toss the hot wings in a bowl with the glaze, or brush them right before serving. Either way, the contrast of crisp skin and sticky coating is the payoff.
What to Watch For
- Flare-ups: If fat drips and flames leap, move wings back to indirect heat. A little char is good; blackened is not.
- Uneven cooking: Larger drumettes may need an extra minute. Check each piece with your thermometer.
- Soggy skin: If your wings come out limp, the drying step was too short or the grill wasn't hot enough.
Takeaway
Backyard grilled chicken wings are about patience and heat management. Dry the wings, use two zones, and finish with a quick glaze. That's it. No gimmicks. Just honest technique that works every time. Fire up the grill and give it a try.
Note: Caffeine affects people differently. For personal dietary or health questions, consult a qualified professional.
Frequently Asked Questions
Why use baking powder on chicken wings?
Baking powder (not baking soda) raises the skin's pH and helps it dry out, creating a crisper texture when grilled. It also promotes browning without burning.
Can I grill wings without a two-zone fire?
You can, but it's harder. Direct heat alone often burns the skin before the meat cooks through. Two-zone gives you control: indirect for even cooking, direct for a final char.
What if I don't have an instant-read thermometer?
Look for the meat pulling away from the bone and juices running clear. A thermometer is more reliable though — wings are safe at 165°F but taste best at 175-180°F for tender texture.
Can I make the glaze ahead of time?
Yes. Prepare the glaze up to 3 days ahead and store in the refrigerator. Reheat gently before tossing with the wings.
What's the best wood for smoking wings?
Fruit woods like apple or cherry give a mild sweetness. Hickory can be too strong. Add a few soaked chips to the coals for extra flavor.
Backyard Grilled Chicken Wings

Crispy-skinned, juicy chicken wings grilled over indirect and direct heat with a simple savory glaze. No deep-frying, no complicated rubs.
- charcoal or gas grill
- tongs
- instant-read thermometer
- small saucepan
- basting brush
- large bowl
- paper towels
- 2 pounds chicken wings (separated into flats and drumettes)
- 1 tablespoon baking powder (aluminum-free)
- 1 teaspoon fine sea salt
- 1/2 teaspoon black pepper
- 1/4 cup unsalted butter
- 2 cloves garlic (minced)
- 2 tablespoons honey
- 1 tablespoon soy sauce
- 1 tablespoon apple cider vinegar
- 1/2 teaspoon smoked paprika (optional)
- Pat the wings completely dry with paper towels. In a large bowl, toss wings with baking powder, salt, and pepper until evenly coated. This step is crucial for crisp skin.
- Place the wings on a wire rack over a baking sheet. Refrigerate uncovered for at least 1 hour (or up to 24). This dries the surface further.
- Prepare your grill for two-zone cooking: one side high direct heat (400-450°F), the other side indirect heat (around 325°F). For charcoal, bank coals to one side. For gas, light one burner and leave one off.
- Arrange wings on the indirect heat side, skin side up. Cover and cook for 20 minutes, flipping once halfway. The skin should be golden and rendered.
- Move wings to the direct heat side. Grill 2-3 minutes per side, watching closely, until the skin is charred in spots and internal temperature reaches 175°F.
- While wings grill, make the glaze: In a small saucepan over medium heat, melt butter. Add garlic and cook 30 seconds. Stir in honey, soy sauce, vinegar, and paprika. Simmer 2 minutes, then remove from heat.
- Transfer grilled wings to a clean bowl. Pour glaze over and toss to coat. Serve immediately.
For a spicier version, add 1/2 teaspoon cayenne to the glaze. Leftover wings reheat best in a 350°F oven for 5 minutes. The baking powder trick works with any dry rub.
Recipe: Backyard Grilled Chicken Wings
Equipment
- charcoal or gas grill
- tongs
- instant-read thermometer
- small saucepan
- basting brush
- large bowl
- paper towels
Ingredients
- 2 pounds chicken wings (separated into flats and drumettes)
- 1 tablespoon baking powder (aluminum-free)
- 1 teaspoon fine sea salt
- 1/2 teaspoon black pepper
- 1/4 cup unsalted butter
- 2 cloves garlic (minced)
- 2 tablespoons honey
- 1 tablespoon soy sauce
- 1 tablespoon apple cider vinegar
- 1/2 teaspoon smoked paprika (optional)
Instructions
- Pat the wings completely dry with paper towels. In a large bowl, toss wings with baking powder, salt, and pepper until evenly coated. This step is crucial for crisp skin.
- Place the wings on a wire rack over a baking sheet. Refrigerate uncovered for at least 1 hour (or up to 24). This dries the surface further.
- Prepare your grill for two-zone cooking: one side high direct heat (400-450°F), the other side indirect heat (around 325°F). For charcoal, bank coals to one side. For gas, light one burner and leave one off.
- Arrange wings on the indirect heat side, skin side up. Cover and cook for 20 minutes, flipping once halfway. The skin should be golden and rendered.
- Move wings to the direct heat side. Grill 2-3 minutes per side, watching closely, until the skin is charred in spots and internal temperature reaches 175°F.
- While wings grill, make the glaze: In a small saucepan over medium heat, melt butter. Add garlic and cook 30 seconds. Stir in honey, soy sauce, vinegar, and paprika. Simmer 2 minutes, then remove from heat.
- Transfer grilled wings to a clean bowl. Pour glaze over and toss to coat. Serve immediately.